• Skip to primary navigation
  • Skip to main content
  • Skip to primary sidebar

Bo's Kitchen

Plant based recipes made with love

  • Recipes
    • Breakfast
      • Blueberry breakfast muffins
      • Bagels
      • Granola
        • Chunky almond granola clusters
      • Pancakes
        • Chickpea pancakes
        • Cinnamon buckwheat pancakes with chocolate sauce
      • Parfait
        • Chia and beet mousse parfaits
        • Cherry chia jam parfait
        • Carrot cake breakfast parfait
        • Blueberry buckwheat parfait
        • Buckwheat parfait with acai lavender cream
      • Porridge
        • Spiced apple pie oatmeal
        • Banana and peanut butter baked oatmeal
        • Tropical bircher bowls
        • Hazelnut overnight oat cups
      • Smoothies
        • Salted caramel smoothie bowls
        • Acai Almond Breakfast Bomb
        • Kiwi mango smoothie bowls
        • Baobab sunshine smoothie bowls
        • Radiant skin smoothie bowl
        • Skin glow smoothie bowl
        • Berry beet smoothie bowl
        • Mint choc breakfast pot
        • Blueberry walnut whip with carob sauce
      • Tarts
        • Cacao buckwheat breakfast cups
      • Waffles
        • Rainbow waffles
        • Coconut waffles with raw chocolate sauce
        • Aquafaba waffles with cashew cream
    • Drinks
      • Nutella Milk
      • Cookie dough milkshake
      • Blueberry acai iced latté
      • Rose sherbet
      • Tropical golden kiwi smoothie
      • Strawberry kiwi slushie
      • Tropical turmeric smoothie
      • Kiwi vanilla power matcha smoothie
    • Mains
      • Spinach pesto pasta with almond parmesan
      • Veggie gyoza (dumplings)
      • Stuffed pumpkins
      • Sweet potato gnocchi in sage butter sauce
      • Roasted squash soup with crispy chickpeas
      • Ultimate pizza dough
      • Herby flatbreads with pink pickles
      • Golden roti,curried carrot falafel and masala corn
      • Chia and fennel green pizza
      • Beet cucumber and avo maki
      • Sweet and spicy golden chia pizza
      • Mini sunshine pizzas
      • Spicy & smoky wedges with guac
      • Smoky chickpea tortillas with tahini sauce
      • Spicy plantain with rice and peas
      • Baked kale falafel
      • Chickpea sunshine pizza
      • Easy Pho
    • Sides
      • Sausage rolls with sweet potato and caramelised onion
      • Onion Bhaji with a lime and coriander dip
      • Green Goddess dip
      • Beet houmous and golden curry dip
    • Sweets
      • Bliss balls & truffles
        • Chia bliss balls
        • Pear bliss balls
        • Chocolate marzipan truffles
      • Cakes/tarts/brownies
        • English scones with jam and whipped cream
        • Salted caramel tarts
        • Chocolate tarts (no bake)
        • Gingerbread cheesecake
        • Peanut butter chocolate tart
        • Strawberry cake
        • Raw chocolate cheesecakes
        • Strawberry tarts
        • Lemon coconut tarts
        • Cinnabon cake
        • Choc chip blondies
        • Gingerbread cupcakes
        • Pumpkin spice muffins
        • Chai latté donuts
        • Coconut caramel tarts
        • Blackberry aquafaba muffins
        • Marbled banana bread
        • No bake nut brownie
        • Berry galettes
        • Baked mini donuts
        • Cacao banana maca muffins
        • Chia jam tarts
        • Chocolate and peanut butter marble cake
        • Double chocolate and raspberry brownies
        • Matcha and blackberry curd tarts
        • Mini Mocha Cheesecakes
        • Raw kiwi cheesecakes
        • Raspberry choc chip muffins
        • Strawberry cookies and cream cheesecake
      • Cookies & bars
        • No bake ‘Twix’ bars
        • Choc chip almond butter cookies
        • Chocolate almond slice
        • Berry boost cookies
        • Clementine sesame raw cookies
        • Cranberry and pistachio energy bars
        • Lazy cookies
        • Jammie Dodgers
      • Ice cream
        • Cherry cheesecake ice cream
        • Cherry coconut nice cream
        • Lemon nice cream with berry superfood sauce
        • Caramel nice cream
        • Matcha choc chip ice cream sandwiches
        • Kiwi and lime chia popsicles
        • Strawberries and cream ice lollies
  • Contact
  • About

bos.kitchen

Chia bliss balls

12th December 2016 by bos.kitchen Leave a Comment

20161119-img_8030

It’s getting so cold here lately. It takes a lot to tempt me out of the house if I’m honest! It’s not all bad though, I love nothing more than drinking endless cups of tea whilst rustling up new recipes in the kitchen when the nights get longer. A whole host of new seasonal ingredients and comforting winter recipes are tempting me every day, I’m bubbling over with ideas!

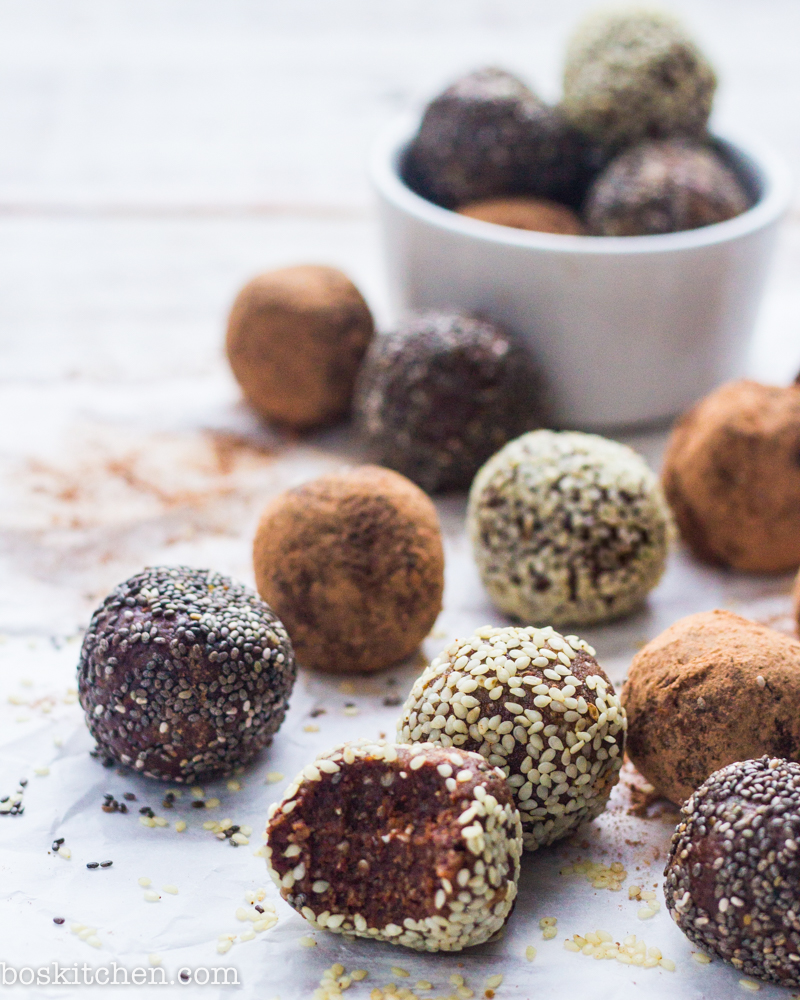
There’s a few basic recipes that I always fall back on whatever the weather and these balls are one of them. The beauty of a bliss ball is that it requires hardly any cooking, minimal ingredients and it is almost impossible to get them wrong. The results are instant too, no need to wait for them to cook! My kind of recipe. I tend to become a bit of  a snack monster when I’m cold, so a bliss ball can be just the thing to stop me reaching for something carby and sugary before dinner.

As well as being incredibly tasty and addictive, these babies are packed with goodness, oats, almonds, seeds, chia, dates and spices.

These are so easy to make, I’d love to know what you think if you try them!


  • 1 cup oat flour
  • 1/2 cup almond flour
  • 3 tbsp chia seeds
  • 3 tbsp sesame seeds
  • 1 tbsp flaxseed
  • 2 tsp cinnamon
  • 1/2 tsp mixed spice
  • 1 tbsp cacao (optional, leave out for a plain version)
  • 1/2 cup soft pitted dates
  • 1 tsp vanilla extract
  • 4 tbsp coconut oil
  • 4 tbsp maple syrup

Toppings –

Chia seeds, cacao powder, sesame seeds
1. Add all dry ingredients to your food processor and pulse briefly to combine.
2. Add in dates, vanilla, coconut oil and maple syrup and pulse until a dough is formed. Add more flour if it’s too wet, or a little water if it’s too dry.
3. Roll in chia seeds, cacao and sesame seeds and store in the fridge for up to 4 days in an airtight container.


Filed Under: Sweets Tagged With: almond flour, bliss balls, cacao, chia, coconut oil, dates, easy, sesame, snack

Chocolate and peanut butter marble cake

22nd November 2016 by bos.kitchen Leave a Comment

Chocolate, vanilla and peanut butter marble loaf

Do you like cake? Do you like chocolate and peanut butter? Yes? Well you’re in the right place, my friend. This chocolate peanut butter marble cake has been sent to satisfy your cake cravings. This was actually a treat for my boyfriend, who has been rambling on about a special cake for the past few weeks. He kept saying he doesn’t want anything fancy, just a ‘marble cake’. I dread to think what I’m going to have to make when he tells me his idea of ‘fancy’!

This baby is so easy to prepare but looks like it takes a lot of skill to bake (perfect for wowing that special someone). You can make it in a loaf tin, or two sandwich tins for a traditional cake. I bet it would be lush with a peanut butter cream in the middle. It’s made with spelt and plain flour, but feel free to sub with all spelt if you prefer, or a gluten free plain flour. I used ‘aquafaba’ for this cake too, which is basically the liquid from a tin of chickpeas or white beans. Sounds gross, but works amazingly well as an egg substitute and I promise it doesn’t leave any chickpea flavour at all.

Do you have a favourite cake? Please let me know if so in the comments below as I really enjoy veganising cakes. This cold weather has got me craving baking time too, so I’m on the lookout for new baking adventures!


Chocolate peanut butter marble cake

Dry 

  • 1 cup plain flour
  • 2/3 cup spelt flour
  • 1 tsp baking powder
  • 1/2 cup avocado or coconut oil (melted)
  • 1/2 cup coconut sugar
  • 1/4 cup cacao powder

Wet 

  • 1/4 cup aquafaba liquid
  • 1 tsp vanilla extract
  • 1/2 cup nut mylk (I used almond)
  • 1/3 cup peanut butter
  • 1/2 cup boiling water
  1. Preheat oven to 180•c and line a loaf tin or two sandwich tins with greaseproof paper.
  2. Mix all dry ingredients apart from the cacao together in a bowl. Add all wet ingredients to the mix apart from the boiling water and stir well to combine. Add a little more almond mylk if you need to loosen the peanut butter.
  3. In a medium bowl, mix 1/4 cup cacao with 1/4 cup of boiling water. Now add half the cake mix to this bowl and mix to incorporate.
  4. To the remaining batter, add in 1/4 cup boiling water and mix. Now you should have one bowl of chocolate batter and one bowl of plain batter.
  5. Spoon dollops of each mix into your prepared tin. Once complete, swirl through with a chopstick to create the marble effect.
  6. Bake in the oven for 50 minutes, or until a toothpick comes out clean. Stores well in an airtight container for up to 4 days.

Filed Under: Sweets Tagged With: baking, cacao, cake, chocolate, marble, peanut butter, vanilla

Pear bliss balls

9th November 2016 by bos.kitchen Leave a Comment

pear bliss balls

I do love a bliss ball, a healthy, refined sugar free morsel of energy can keep you going when you’re trying to hold out until tea time. I adore pears, sweet, juicy and delicately flavoured, they are such a pretty fruit. I decided to combine my two loves this month and the pear bliss ball was formed!

These are almost raw, apart from the pear puree- but they’re still refined sugar free and thanks to the puree you’re getting a fair bit of fruit in each bite too.

These little cuties are packed with all the good stuff – nuts, fruit, oats and chlorella. This superfood has the highest chlorophyll of any plant and is a whopping 56% protein. It alkalises the body, improves digestion (I can vouch for this) and increases energy, it’s powerful stuff! You can’t even taste it in these balls, so these would be great for little ones too. If you don’t have chlorella you can try using wheatgrass, matcha or spirulina instead.

Pear bliss balls  – Makes around 16

  • 4 pears, finely chopped
  • 1/4 cup water
  • 1 tbsp coconut sugar
  • Juice of half a lemon
  • 1/2 cup almonds
  • 1 cup pecans
  • 1 1/2 cup oats
  • 1 tsp cinnamon
  • 1/8 tsp all spice
  • 1-2 tsp chlorella (I always use Organic Burst)
  • 1/2 cup pitted dates
  • Cacao nibs, mint leaves and cacao powder for decoration
  1. Make your pear puree by adding pears, water, coconut sugar and lemon juice to a small pan. Bring to the boil and then simmer gently for about 20-30 minutes, until sweet and thick. Set aside to cool.
  2. Add almonds and pecans to a food processor and pulse until small, crumbly pieces. Add in oats, cinnamon, all spice and chlorella and pulse again until combined. Add dates and 3/4 cup of pear puree and pulse until a dough is formed. If it’s too sticky, add a few more oats, tbsp at a time. If it’s too dry, add a little water until the mixture comes together.
  3. Shape mix into little pear shapes. The best way to do this is to make a ball, then start rolling the top half of the ball flat on a board with your finger, to make a little pear shape. Add a little cacao nib for the stem and mint for the leaves and dust lightly with cacao powder. Keep in an airtight container in the fridge for up to a week.

Filed Under: Sweets Tagged With: bliss ball, chlorella, coconut sugar, dairy free, dates, easy, nuts, pear, snack, vegan

Green Goddess dip

16th October 2016 by bos.kitchen Leave a Comment

20161016-img_7488I’m so excited to share this with you – my Green Goddess dip. If there was a bowl of self-love, this would be it.

This dip is gonna get you glowin’ girrrrl…or boy, if you’re cool enough to be reading this.

It’s my quick fix when I need a bit of a detox. I had this for a snack after breakfast today and I’ve only just remembered I need to eat dinner. It’s kept me full and energised all day! That is no mean feat. Healthy dips like this are incredibly easy to whip up and you can also use it on pasta, tortillas, burritos, sandwiches, rice cakes, baked potatoes… you get my drift. I just love having something like this in the fridge for those random savoury hunger pangs I often get in the evening.

I’ve loaded this with beautiful, powerful ingredients to help nourish and detox. First up- my favourite superfood, spirulina- packed with chlorophyll that removes toxins from the blood. It’s also loaded with iron, essential for all cell renewal in the body.

Kale actually activates detoxifying enzymes in the liver and is rich in antioxidants – hello gorgeous skin! Garlic improves circulation and boosts the immune system, which is a good job because I eat garlic every damn day. Avocado clears and nourishes the skin and is full of vitamins A, B, C, E and K- I’ll take all of them today please!

I hope you have a hot minute to make this dip. You may just be rewarded with energy, good health and the glow of a Goddess.

Green Goddess dip

  • 3 cloves garlic, peeled
  • 2 large handfuls kale, roughly chopped (include the stems)
  • Juice of 2 lemons
  • 5 tbsp avocado oil
  • 2 medium sized avocados
  • 2tsp organic spirulina (I use Organic Burst)
  • 1 tin cannellini/white beans, drained and rinsed
  • Handful of parsley
  • 1/4 tsp salt
  • Black pepper, to taste


  1. Add garlic to the food processor and pulse briefly to chop.
  2. Add all other ingredients, pulsing until smoothy and creamy. Taste, season and adjust as needed.


Filed Under: Sides Tagged With: avocado, dip, gluten free, green, kale, lemon, parsley, spirulina, vegan

Coconut waffles with raw chocolate sauce

5th October 2016 by bos.kitchen Leave a Comment

20160930-img_7270Oh hello there! I can’t believe it’s October already! Time is really flying this year and last month was the most hectic month yet. I now have two new kittens (Harry and Sushi) in my life and they are just about the best thing that’s ever happened to me. Have you ever tried to be in a bad mood with two tiny balls of fluff laying in your arms kissing each other? Well I have and it’s impossible. They definitely keep me on my toes. All I need to do now is train Sushi to stop climbing me like a tree when I’m about to feed her and we’ll be in crazy cat lady heaven. Life admin has taken over this month and I’ve been a bit behind with posts and photography but I’m ready to go again now, so expect some weekly updates for the rest of the year. I have a whole backlog of recipes I need to publish!

I am a true coconut lover, I think I have five jars of coconut oil at the moment, shredded coconut, coconut chips, coconut butter and coconut sugar. I also have coconut scented toiletries too, it never ends! It seemed only natural that I should indulge my coconut fantasies in the form of waffles. They didn’t disappoint. These coconut waffles are light and crispy and the raw chocolate sauce turns these beauties into something pretty special. You can keep the waffle batter for up to four days in the fridge, so this is a great recipe to make in advance for a lazy weekend. I added spirulina to the chocolate sauce, just to sneak some of my fave superfoods in. The recipe makes a lot of sauce, so you can make some raw chocolate with the rest (just pour it into a tray and set in the freezer), or just continue making waffles and chocolate sauce the whole week, which sounds like a great idea to me.

Coconut waffles

  • 1 flax egg (1 tbsp flax seed mixed with 3 tbsp water)
  • 1 cup plain flour (can sub plain gluten free flour)
  • 3 tbsp coconut sugar
  • 2 tbsp baking powder
  • 1/2 cup coconut milk
  • 1/2 cup water
  • 2 tbsp coconut oil, melted

Raw chocolate sauce

  • 1/2 cup organic cacao powder
  • 1/2 cup organic coconut oil
  • 1/4 cup maple syrup
  • 1 tsp Organic Burst spirulina (optional)
  1. Make your flax egg by mixing ground flax seed with water. Stir well and leave to rest to form a gel while you make the rest of the waffle batter.
  2. Add all waffle ingredients to a food processor and blend until combined. Add flax egg and pulse again. The mixture should be thick but pourable. Add a little more water if you need to. Chill batter in the fridge while you make chocolate sauce.
  3. Add cacao powder, coconut oil and maple syrup to a small pan and heat very gently until the coconut oil has melted. Take off the heat and stir through spirulina, if using.
  4. Turn on your waffle maker and pour in chilled batter. Cook until golden on both sides, then top with raw chocolate sauce, toasted coconut chips and fruit.


Filed Under: Breakfast Tagged With: cacao, chocolate, coconut, raw, spirulina, vegan, waffle

Chia jam tarts

23rd September 2016 by bos.kitchen Leave a Comment

chia jam tarts with spiced walnut pastry

These jam tarts are sugar and gluten free and contain my favourite superfood, chia seeds. …

Read More »

Filed Under: Sweets Tagged With: chia, chia jam, cinnamon, gluten free, pastry, pear, plum, sugar free, vegan, walnut

Cacao buckwheat breakfast cups

19th September 2016 by bos.kitchen Leave a Comment

cacao buckwheat breakfast cups gluten freeThis month has been full of change. In a really good way. So far I’ve been to a festival in a forest, spent five days in London with my best friend and made some really interesting new connections. It’s only the 19th already! I feel like I’ve learnt to embrace this rollercoaster of a year and welcome whatever else is coming my way with open arms. I definitely don’t feel like I’m the same person I was at the start of the year. It’s weird how sometimes a few months can make you feel like you’ve grown so much. I am truly grateful for the lessons this year has taught me. Without all of them, I wouldn’t be in this place right now. It’s a good feeling knowing it was all for a reason. I have so many plans for the next few months too, so it looks like the end of the year will continue to be eventful!

Anyway, back to breakfast cakes…. these little buckwheat babies are so simple to make and although they look like sweet little tarts, they are loaded with goodness. These raw, gluten free shells are free from nuts and sugar, and a couple in the morning will keep you going until lunch. Buckwheat is a super nutritious whole grain, great at fighting off those mid morning hunger pangs. Cacao is a natural anti depressant and improves your mood.. sounds like perfect Monday morning fuel to me! Load them up with yoghurt and your fave fruits, or make the shells in advance and decorate before serving. I guess these would make great party snacks too. I’m tempted to make them even smaller, into little canapés… I love tiny things! Unless we’re talking jars of peanut butter, then the bigger the better…

Cacao buckwheat breakfast tarts

For the tart shells (makes about 8 small tarts)

  • 1 cup buckwheat
  • 1 tsp lucama powder (optional)
  • 1/2 cup cacao powder
  • 1 cup dates, pitted
  • 3 tbsp coconut oil, melted
  • 100ml water

For the filling

  • 1/2 cup non dairy yoghurt
  • 1 vanilla pod (deseeded)
  • Fresh fruit
  • Black sesame seeds and mint for garnish
  1. Roughly pulse buckwheat, lucama and cacao in a food processor until starting to crumble.
  2. Now add the dates, coconut oil and water and pulse until the mix comes together in a ball. Add water a tbsp at a time if it is too dry. You should be able to squish it between your fingers without it falling apart.
  3. Take out golf ball size lumps of dough and flatten in your palm. Press into a cupcake mould (I used a silicone one). Pop in the freezer for 30 minutes to firm up.
  4. Mix vanilla pod seeds with non dairy yoghurt and spoon into your tart shells. Garnish with fresh fruit, sesame seeds and mint. Store in the freezer for up to a month. Best eaten after thawing out for 15 minutes.


Filed Under: Breakfast, Sweets Tagged With: breakfast, buckwheat, cacao, cherry coconut nice cream vegan dairy free gluten free, gluten free, lucama, nut free, raw, shell, tart, yoghurt

Golden roti,curried carrot falafel and masala corn

7th September 2016 by bos.kitchen Leave a Comment

golden masala corn with turmeric roti and curried carrot cakes

Anyone who knows me knows how much I love Indian food. If I could eat one cuisine for the rest of my life, it would be Indian! I just love the complexity and layers of flavours and the huge variety of vegetarian dishes. Enter these vibrant golden roti with curried carrot falafel and masala corn.

This dish is a fusion of all the things I love, with a healthy twist to celebrate my lovely friend Janine’s carnival on her blog and Instagram page. The idea is to create a healthy version of our favourite ‘fast food’ and this recipe, although it looks quite long is actually very quick to prepare and satisfies all my ‘fast food’ cravings. It’s full of flavour and gives me everything I crave when hunger strikes- veggies, spice and protein. You can prepare the curried carrot falafel and masala corn in advance, so you only have the roti to make on the day, then you can eat this in less than 10 minutes! Check out the details on her blog here or if you’re on Instagram, use #healthyfastfood4 to see all the entries so far. I particularly love Tiina’s sweet potato sandwich with cashew cheese. Drool!

Golden roti, curried carrot falafel and masala corn

If you’re making the whole thing, make the carrot cakes first, then the corn masala and the roti last.

Serve with veggies of choice- I used tomatoes, shredded cabbage and massaged kale. For a speedy meal, prepare the carrot falafel mix in advance, store in the fridge and then shape and fry while you make your roti.

Curried carrot falafel

  • 1 tin chickpeas, drained and dried with a towel to remove any liquid
  • 3 large carrots
  • 1 tsp cumin
  • 1 tsp coriander
  • 1 tsp chili seeds
  • 1 tsp coconut oil
  1. Chop your carrots into small chunks and boil until soft. Drain, allow to cool, then mash in a large bowl with the chickpeas. Stir through the spices.
  2. Heat a skillet over a medium heat and add the coconut oil. Shape into little balls or patties and lightly fry until golden.

Corn masala

  • 2 fresh corn on the cob
  • 1 red onion
  • 1 red chili
  • thumb size piece of ginger
  • 2 tsp black mustard seeds
  • 1 tsp cumin
  • 1 tsp coriander
  • 1 tsp coconut/avocado oil
  • 2 cloves garlic
  • 1/2 tsp garam masala
  1. Heat a medium pan on medium/high heat with the coconut oil and add corn, onion, chili, ginger and spices. Fry for 7-8 minutes, then add the garlic and garam masala and cook for 5 minutes more, taking care not to let the garlic burn.

Golden roti

  • 200g fine cornmeal
  • 100g plain flour (can sub gluten free)
  • 1/2 tsp salt
  • 1/2 tsp turmeric
  • 2 tbsp avocado/coconut oil
  • 1 chili, sliced very finely
  • 3/4 cup hand hot water
  1. Mix cornmeal, flour, salt, turmeric and oil together in a medium sized bowl with your fingers or a fork, until crumbs.
  2. Stir through the chili and add the water a little at a time, until a smooth dough is formed. Knead for a minute or two until soft and pliable. Split dough up into golf ball size pieces.
  3. Heat a frying pan or skillet to a medium/high heat and brush lightly with a little coconut oil.  Roll out roti into small disks, around 5mm thick. Lightly fry roti for three minutes each, turning half way through cooking.


Filed Under: Mains Tagged With: carrot, chickpea, curry, kale, masala, roti, sweetcorn, turmeric

Chunky almond granola clusters

5th September 2016 by bos.kitchen 1 Comment

chunky almond granola clusters with maca

Granola is just one of those things I wish I’d started making years ago. It can be so expensive to buy and they are often laden with as much sugar and salt as regular cereals. I set about making my own after trying several recipes and I’m now sharing the result with you. Making your own granola means you can make it just how you like it, it’s fairly hard to go wrong! This recipe is super flexible, so if you don’t have any of the ingredients just stick with the same rough proportion of wet to dry ingredients and you can be sure to whip up your own exclusive batch of breakfast heaven. The most important thing to remember is not to break it up on the baking tray while cooking and to let it cool completely before smashing to pieces (I enjoy this bit). Granola is amazing with yoghurt, on top of oatmeal or just on its own! The perfect nutritious snack.

Chunky almond granola clusters

  • 1 1/2 cup rolled oats
  • 1 cup almonds
  • 3/4 cup walnuts or pecans
  • 1 cup dried fruit (I used cherries)
  • 2 tbsp Organic Burst chia seeds (optional)
  • 1/2 cup sunflower seeds
  • 1/2 cup desiccated coconut
  • 2 tsp cinnamon
  • 1/2 cup maple syrup or agave
  • Pinch of himalayan pink salt
  • 1/4 cup coconut oil, melted
  • 2 tsp vanilla extract
  • 2 tsp Organic Burst maca powder (optional)
  1. Preheat oven to 140°C and line a baking sheet with greaseproof paper.
  2. Blend almonds in a food processor into a rough crumb, leave chunkier for a crunchier granola. Add the almonds and oats to a large mixing bowl.
  3. Briefly pulse walnuts /pecans, just to break them up a little. Add to the mixing bowl.
  4. Add all other ingredients to mixing bowl, stirring really well until everything is coated evenly.
  5. Press the mixture down into a large flat piece of granola (almost like a flapjack) and bake in the oven for 20 minutes. After 20 minutes, turn the granola around in the oven, don’t break it up (this is the key to clusters).
  6. Check again after 15 minutes and if it’s starting to brown around the edges, take it out. It should take no longer than another 20 minutes until it’s ready.
  7. Take out the oven and leave to cool completely before breaking into chunky clusters. Stores in an airtight jar for two weeks.

Filed Under: Breakfast Tagged With: almond, chia, chunky, cinnamon, clusters, granola, maca, nuts, oats, walnuts

Chia and fennel green pizza

31st August 2016 by bos.kitchen 3 Comments

chia and fennel seed pizza crust

I’ve just realised that this is my third pizza recipe. I must really love pizza! I think what entices me the most is how adaptable it is, you don’t really need to have much in the cupboards to whip up a pizza. I always end  up chopping up more veggies than I need for toppings.

I had a craving for a green pizza this week, a herby, summery, savoury affair but with a crisp base that tastes like the real deal. This is honestly so delicious I will be making more houmous at the weekend just so I can have it again next week for lunch. The fennel seeds work really well with the garlic infused pesto. Pesto houmous is also my new favourite thing- SO GOOD.  I thoroughly recommend using marinated artichokes on top, because they are just the most delicious vegetable in the world and every pizza tastes better with more artichokes. A good thing about being vegan and asking for a pizza with no cheese when I eat out is that I get to ask for more artichokes instead. I’m all about the artichokes.

Recipe

Chia and fennel seed pizza crust

  • 1 cup gram(chickpea) flour
  • 1 cup water
  • 2 tbsp chia seeds
  • 5 tbsp water
  • 1 tbsp fennel seeds
  • Salt and pepper

Kale pesto

  • 5 large handfuls of kale
  • 2 lemons, juiced
  • 1 bunch of basil (large handful)
  • 4 garlic cloves
  • 1 cup of walnuts
  • 2 tsp Organic Burst wheatgrass (optional)
  • 1/4 cup good quality extra virgin olive oil
  • Salt

Houmous

  • 1 tin of organic chickpeas
  • 1 tbsp tahini
  • 2 garlic cloves
  • 1 lemon, juiced
  • 1/2 tsp cumin seeds
  • 1/4 cup of water/liquid from the can of chickpeas

Kale pesto –

  1. Start by blending your garlic cloves in a food processor until finely minced.
  2. Add all other ingredients and blend until smooth.
  3. Store your kale pesto in a jar for up to four weeks in the fridge, covering with a thin layer of olive oil to keep it fresh.

Houmous –

  1. Blend garlic in a food processor until fine.
  2. Add all other ingredients and mix until smooth and creamy, adding more water/chickpea liquid a little at a time if you need to.
  3. If you want to make kale pesto houmous, simply mix equal parts houmous and kale pesto.

Chia and fennel seed crust-

  1. Preheat your oven to 180°c and line a baking tray with greaseproof paper.
  2. To make the pizza crust, mix the chia seeds with 4tbsp of water and leave to form a gel. This should take around 5 minutes.
  3. Add all dry ingredients to a medium sized mixing bowl and stir to incorporate. Now add the cup of water and the chia seed gel. Mix until it’s smooth but still quite thick, you want it to slowly drop of the spoon, like a thick paste.
  4. Spread the base over your prepared baking tray and cook for 20 minutes, until firm.
  5. Allow to cool and then top with kale pesto houmous, courgette ribbons, red onion, fresh oregano, fresh basil, marinated artichokes and sesame seeds.

Filed Under: Mains Tagged With: chia, chia seed, dairy free, fennel, gluten free, humous, kale, pesto, pizza, pizza crust, quick, vegan

  • « Go to Previous Page
  • Page 1
  • Interim pages omitted …
  • Page 7
  • Page 8
  • Page 9
  • Page 10
  • Page 11
  • Interim pages omitted …
  • Page 14
  • Go to Next Page »

Primary Sidebar

About me

Hello and welcome to my blog! I'm a vegan recipe developer from the UK with a passion for healthy, delicious food. Read More…

Creamy vanilla cheesecakes with cranberry compote❣ Creamy vanilla cheesecakes with cranberry compote❣️ such a deliciously creamy and tangy combo and perfect for your festive table🎄If you don’t have a mini cheesecake tin you can also make this into one big cheesecake instead 😋 The filling is oh so creamy, you’d never guess it was dairy free! 

As a little gift 🎁 before the end of the year I’d love to offer two people the chance to WIN a copy of my cookbook and some dairy free goodies - just tag a friend below and I’ll pick the winners on Friday!😌🌟

Vanilla cheesecakes with cranberry compote (makes 9)

250g ginger nut biscuits
100g dairy free butter
300g cashews, soaked overnight
340g dairy free cream cheese
80g icing sugar
1 tbsp vanilla extract 
200g coconut cream
2-4 tbsp coconut milk 

200g fresh cranberries
5 tbsp water
5 tbsp caster sugar 

Prepare the base by processing ginger biscuits and butter together to a fine crumb. Press into a mini cheesecake tin and set aside in the fridge to chill. 

Add soaked cashews to a food processor and blend on high for 10 minutes until smooth and silky. Add in dairy free cream cheese, icing sugar, vanilla, coconut milk and cream and process until fully incorporated. Pour cheesecake filling on top of the bases and set aside to chill overnight in the fridge. 

To make the compote, add cranberries, water and sugar to a small pan and bring to a simmer. Cook for 10-15 minutes until jammy. Spoon compote on top of the cheesecakes and enjoy!

#dairyfree #vegandessert #dairyfreerecipe #veganrecipes #cheesecake #dairyfreebaking #veganfoodie #veganfoodies #veganlife #festivebaking #dairyfreedesserts #veganuk #eattherainbow
Follow on Instagram

Let’s get connected

  • Facebook
  • Instagram
  • Pinterest


Privacy Policy

Copyright © 2026 · Foodie Pro Theme by Shay Bocks · Built on the Genesis Framework · Powered by WordPress


Loading Comments...